Gingerweb Blog
Generic Child variations - Virtuemart 3
So you have a product with variations and you want to show a different image for each variation, maybe with a different price but definitely on the same Virtuemart 3 product page?
This is quite simple to achieve, just follow the direction below bit by bit, don't skip anything because "I don't need to do that" !!
1. Prepare your images.
Get your images ready before you start. I always suggest that images across a Virtuemart shop are a consistent size. They then all line up neat and tidy, keep them under 800x800px to reduce loading times, Square is easiest but sometimes there are images that have to be portrait or landscape. For this tutorial just make each image for this one variant product all the same size.
Rename them the title of the product - This is really important so that Google images will understand what they are, you do want to sell these products right?
Google will not like IMG1234.JPG but it will love Mizuno s5 Blue Ion Wedge-50.7.JPG
2. Create your PARENT product.
Virtuemart/Products and select New
![]()
The Parent product needs most sections completed (Not the SKU or the Stock control though). The idea is that the Parent product shows the customer the Title, Description, Category, Price etc and later the Child products show the variation o this one.
So complete each tab as required
Product Information - The first tab

If you have not setup a price before all you need to do is enter the final total price you want the item to sell for in the "Final price" box and tick the "Calculate the Cost Price" box - when you SAVE this will set it up properly for you.
Highlights of the other Product tabs are;
Description, complete as required
Status, Ignore as each "Child" will control your stock (comes later)
Dimensions and weight, Ignore as each "Child" will control your stock (comes later)
Images: Upload an image here (As above if it isnt already the right size you are not doing yourself any favours!) - this will show up when the customer views the product so assuming all of your items are the same (maybe a different size or colour) just upload any one of the images here.

To upload the image just click SAVE.
To go to the top of the class i suggest you tag your images here too. After uploading an image click on the small icon on the bottom right of the thumbnail:

Then complete the boxes below - again you want Google to find your images dont you ?

OK now it gets important - so concentrate!
 Don't forget to do this or you will have to start again.
3. Create your Custom Field Variant
Now you have to create your Custom Field so that your parent product will display a drop down list of your child products with their variations. So click on Custom Fields in the left hand Virtuemart Menu:

Click on ![]()
or if you already have a "Generic Child Variant" and you want a different one simply click the one you have and click CLONE so you can make adjustments.
The top box ( Title ) is what will show up in the product page above your drop down box so you want this to make sense to the customer - in mine i am going to call it : "Choose Loft and Lie"
There isnt much to change just make sure it looks like this:

The "layout position" determines where it will show up on the page You can use "addtocart" or "ontop" and see which one you prefer. the former displays above the price and the latter above your images.
So now again and go back to your parent product. Click on the Product name and go to the far right tab which says:

At the bottom of the page you will see the option "Custom Field Type" - Find the one you just created and click on it, it will then be shown underneath:

Again -
4. Creating the Child Variants for your Parent
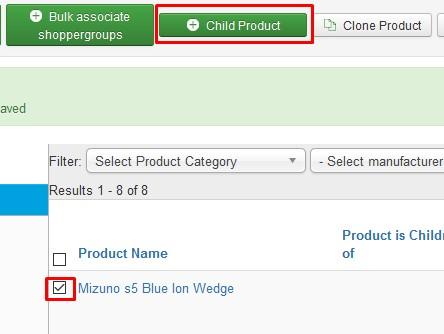
Select the small box to the left of the title of your "parent" and from the top menu select "Child Product"
As this is a "Child" then you dont need to do as much with this, just basically what is different about each variation.
So on mine i will adjust :
The title of the product will display in your page dropdown so make this the actual variation not the title of the product. So this might be "Blue" or "Large" but in my case as this is a golf club it will say "60 degrees 10 degrees of loft"
Add the unique SKU number and you are done on the product information tab.
Adjust the amount of stock you have in the "Product status" tab
Add the weight if you are using this for postage adjustments in the "Product dimensions and weight" tab
Most important is the image for this variation - so i am going to upload the image for the Golf Club that has the variant "60 degrees 10 degrees of loft"
Now click the Button.
If you like you can go to your parent product in your shop and you will see that you have a parent with one variation drop down - well done !
Now lets create the rest of the variations.
The Virtuemart 3 products list can be frustrating. Sometimes it wont show all your products when you go to the list. I find the best way to get around this is to use the Filter boxes above the product list.
Click on "Please Select" and then "Only Parent" and then "GO"

This will just show you your "Parent" products.
We have created our Parent and One Child, we just need to complete the other "Child Variants" now. The quickest and simplest way to create any new product is to "Clone" a similar one so we can just "Clone" the "Child Variant" we have already made:
So find the Parent you need and click the Child product link so you are sure you have opened the right one. If you have followed the instructions above you will have "1 Children" to click as below

All you need to do now is clone as many variations of the first one as you want. So tick the small box to the left of the product and click "Clone Product" from the top row.
If once you Clone a product you cant find it just look for the "unpublished" one or one that has an item ID one bigger than the one you cloned.
Now just make the adjustments to each one so they are different, SKU, Title (delete the "Product alias" box content here too so a new one is created for each child with relevant content), Stock level, Image (remove the cloned product image with the red cross before uploading your new one), Weight and then click:
You are done - go to your product on your live shop and make sure all is well. If something doesnt work go through the steps above and it will work!
When you subscribe to the blog, we will send you an e-mail when there are new updates on the site so you wouldn't miss them.